skip to main |
skip to sidebar
I'm personally not a big fan of chili but my tombee loves it and I always aim to please. Plus, it's always nice in winter to have a steamy bowl of chili to warm you up. I made this in my slow cooker but if you don't have one, just simmer it for 2 hours until it thickens. I made this the night before, then let it sit in order to fully develop the flavours. Tombee loved the chili and I think the chocolate addded a sweet taste and silky mouthfeel to the chili. I made southern buttermilk cornbread from Andrea's blog to go with the chili and I loved the corny taste of the cornbread. However, I found it a little dry and crumbly but since I haven't had much cornbread, I can't compare to other types. When I was searching for a cornbread recipe, most of them included sugar as an ingredient but I thought a savoury, rather than a sweet, cornbread would taste better. I'll definitely have to try a sweet cornbread in the future to compare and see which I like better. Andrea's southern cornbread did go really well with the chili and I ate more cornbread than chili while tombee ate a bite of cornbread and two bowls of chili, and then ate my bowl too!

Chili con Carne
Ingredients
4 tablespoon oil
1lb ground beef
4 garlic cloves, minced
1 large yellow onion, diced
1 green pepper, diced
1 red pepper, diced
2 carrots, diced
1 can whole tomatoes
3 tablespoon tomato paste
1 tablespoon sauce from chipotle peppers
1 chipotle pepper, minced (optional if you like your chili really spicy)
3 tablespoon sugar
1 1/2 cups beef stock
1 can red kidney beans, rinsed and drained
1 can kernel corn, rinsed and drained
2 tablespoon chili flakes (reduce or leave out if you don't want it spicy)
2 tablespoon chili powder (reduce to 1 tablespoon if you don't want it spicy)
1 tablespoon cayenne pepper
2 tablespoon paprika
1 tablesoon oregano
1 teaspoon ground cumin
1 teaspoon ground coriander
1 square bakers chocolate
salt and pepper, to taste
Directions
1. Heat 2 tablespoon oil in a pan and add onions, green pepper, red pepper and carrots and cook until vegetables are soft. Transfer to a bowl and set aside.
2. Add remaining 2 tablespoon in a pan and add garlic. Fry until fragrant, then add ground beef. Break up large pieces of ground beef, then add spices. Mix with meat and fry until mixture is fragrant.
3. Add vegetable mixture back into meat, then add tomatoes, beef stock, chipotle and chipotle sauce, tomato paste, and sugar. Mix until well combined. Taste mixture and add salt and pepper to taste.
4. Add the drained kidney beans and corn and bring everything to a boil. Transfer mixture to a slow cooker and cook on high for 4 hours. Alternatively, you can simmer chili for 2-2 1/2 hours until liquid dries and mixture becomes thick.
5. Add chocolate and stir to completely melt and mix the chocolate in. Taste and add salt and pepper if you'd like.
6. Let sit overnight to allow flavours to develop and reheat when ready or serve right away with cornbread.

I stumbled upon Smitten Kitchen's website a few months ago when I was looking for a recipe for red velvet cake. The red velvet cake was delicious and I constantly went back to Smitten Kitchen's website and I'm a big fan. Her recipes practically beg to be made and I've bookmarked quite a number of things to bake. If you haven't visited her website, then you should definitely take a minute and check it out because it is a gold mine of delicious looking food! I made some changes to her recipe because I didn't have some of the things on hand. I've posted the recipe with the changes that I've made but if you want to see the original, head on over to her site. I made these with a rounded tablespoon and flattened each circle to 1/2" thickness so that they were about the same thickness as a regular Oreo cookie. Since mine were quite small and thin, I only baked them for about 5 minutes in my oven to retain a soft and slightly chewy center but if you'd like something crispier, more like real Oreo's, then bake for about 7 minutes. I saved myself one and took the rest to work and everyone said they were delicious and even better than real Oreo cookies!

Chewy, soft and moist with a creamy and sweet filling.

Homemade Oreos adapted from Smitten Kitchen
Ingredients
For the chocolate wafers:
1 1/4 cups all-purpose flour
1/2 cup unsweetened cocoa powder
2 teaspoon baking soda
1/4 teaspoon baking powder
1/4 teaspoon salt
1 1/4 cups sugar
1/2 cup plus 2 tablespoons (1 1/4 sticks) room-temperature, unsalted butter
1 large egg
For the filling:
1/2 cup (1 stick) room-temperature, unsalted butter
1 - 2 cups sifted confectioners’ sugar
2 teaspoons vanilla extract
Directions
1. Set two racks in the middle of the oven. Preheat to 375°F.
2. In a mixing bowl, using beaters, thoroughly beat the flour, cocoa, baking soda and powder, salt, and sugar. On low speed, add the butter, and then the egg. Continue mixing until dough comes together in a mass and can be formed into a dough.
3. Take rounded tablespoons of batter and place on a parchment paper-lined baking sheet approximately two inches apart. With moistened hands, flatten the dough to 1/2" thickness. Bake for 5-7 minutes, depending on how crispy you would like your cookies to be. Set baking sheets on a rack to cool.
4. To make the cream, place butter in a mixing bowl, and at low speed, beat in the sugar and vanilla, adding 1/2 cup of icing sugar at a time, periodically tasting the cream until you reach the desired sweetness. Turn the mixer on high and beat for 2 to 3 minutes until filling is light and fluffy.
5. To assemble the cookies, in a pastry bag with a 1/2 inch, round tip, pipe teaspoon-size blobs of cream into the center of one cookie. Place another cookie, equal in size to the first, on top of the cream. You can also use a teaspoon or an offset spatula to cover one cookie with cream and then cover with the second cookie. Lightly press, to work the filling evenly to the outsides of the cookie. Continue this process until all the cookies have been sandwiched with cream. 
Sometimes you just need a little something extra to round out a meal. I love this simple yet bursting with flavour dish. It's quick and easy and is something most people keep stocked. You could also substitute ham for the sausage if you don't have the chinese sausage on hand.

Scrambled Eggs with Chinese Sausage
Ingredients
4 eggs
salt and pepper, to taste
1 chinese sausage, thinly sliced
1 tablespoon oil
green onions
Directions
1. Beat the eggs with a fork until smooth. Add salt and pepper.
2. Heat oil in pan and pour in eggs.
3. Wait until edges of egg are set, then stir around. Keep doing this until entire mixture is set but not completely cooked.
4. Push eggs up side of pan and add chinese sausage.
5. Cook until sausage is lightly browned, then quickly mix egg and sausage together.
6. Mix in green onions, stir and serve.
I was inspired by reading a blog a few weeks ago (and for the life of me, I can't seem to remember the name) where the person used mock, or vegetarian "duck". As I had never tried it before, and it looked so duck-like in the photo, I had a strong urge to try it and I looked for it at the grocery store and luckily I found some. I kept wanting to open the can to taste it but couldn't figure out what I should make with it. Earlier this week, I had some garlic stems and wanted something to add to it to make it heartier and I immediately thought of the mock duck. When I opened the can the "duck" had little raised dots on the "skin" just like real duck does and it smelt like soy sauce. The verdict? The texture is quite soft and the primary taste was of soy sauce. Not very duck-like but quite good nevertheless. It makes a good addition to a dish when you just need something a little more substantial. You could also use it to make noodle soup with mock duck and some bok choy.

Garlic Stems with Mock Duck
Ingredients
1lb garlic stems
1 can mock duck, shredded
2 cloves garlic, minced
1 tablespoon olive oil
1 tablespoon soy sauce
1 tablespoon oyster sauce
1/4 cup water
Directions
1. Wash garlic stems and trim ends. Cut to desired length. (I usually like to leave mine at 3".)
2. Heat the oil in a pan and add the minced garlic. When garlic is fragrant, add the garlic stems.
3. Stir fry for 2 minutes until the garlic stems look dry. Add water at this point and cover pan with lid for a few minutes.
4. Uncover and check to see if water has dried. If the garlic stems look tender yet still crisp, add the soy sauce and oyster sauce and stir to coat. If the garlic stems are still not tender, add a bit more water and cover for another 2 minutes.
5. When the garlic stems are coated in the soy and oyster sauce, add the shredded duck and stir fry until the duck is heated through.
6. Serve with rice and enjoy! 
I have to admit that I absolutely adore Martha Stewart. Her recipes always turn out spectacular and her crafts are amazing! I made these black-bottom coconut bars and took them in to work and needless to say, I had none left. I did, however, get a request to make a whole pan for one of my coworkers - they were that good! The bars have a rich chocolate brownie base and are topped with a deliciously creamy coconut mix.

Yum-o! Look at that deliciously flaky coconut...and the mouthwatering brownie base...

Black-Bottom Coconut Bars from Martha Stewart
Ingredients
Chocolate Base
1/2 cup (1 stick) unsalted butter, plus more for pan
1/2 cup sugar
1/4 teaspoon salt
1 large egg
1/4 cup unsweetened cocoa powder
1/4 cup all-purpose flour (spooned and leveled)
For Coconut Topping
2 large eggs
3/4 cup sugar
1/2 teaspoon vanilla extract
1 cup all-purpose flour (spooned and leveled)
1 package sweetened shredded coconut (7 ounces), 1/2 cup reserved for sprinkling
Directions
1. For chocolate base: Preheat oven to 375 degrees. Line a 9-inch square baking pan with aluminum foil, leaving a slight overhang; butter bottom and sides of foil (not overhang).
2. Place butter in a large microwave-safe bowl; melt in microwave. Add sugar and salt; whisk to combine. Whisk in egg, then cocoa and flour until smooth. Spread batter in prepared pan.
3. Bake just until sides begin to pull away from edges of pan, 10 to 15 minutes (do not overbake). Let cool slightly while preparing coconut topping. Keep oven on for topping.
4. For coconut topping: In a medium bowl, whisk eggs with sugar and vanilla. Gently mix in flour and coconut (except 1/2 cup reserved for sprinkling).
5. Drop mounds of mixture over chocolate base; spread and pat in gently and evenly with moistened fingers. Sprinkle with reserved 1/2 cup coconut.
6. Bake until golden and a toothpick inserted in center comes out with moist crumbs attached, 25 to 30 minutes. Cool completely in pan. Lift cake from pan, peel off foil, and cut into 24 bars. Store in an airtight container 3 to 4 days.
*When baking the coconut topping, I kept checking the doneness because I was worried that I would overbake the brownie base but don't be worried because it was so moist that it could have handled an extra 5 minutes in the oven.
**I baked the coconut topping for 30 minutes but when I put a toothpick in, the dough was still a bit wet but I took it out anyway because I was worried about the coconut burning. After cooling, the coconut topping firmed up and was really creamy.
**To make this healthier, you can substitute the butter for applesauce instead. The results are still moist and result in delicious brownie heaven!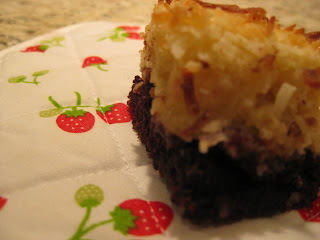
I've wanted to start a food blog for a while now and what better time than a new year right? I've been a lurker around food blogs for a long time and now I'm finally plunging in by creating my own. I love to eat (who doesn't?), cook and bake, and it seems like I'm in the kitchen all the time. When I'm particularly tired, grumpy or lazy, I feel like I'm a slave in my own kitchen. However, at other times, especially when the dishes turn out amazing, I feel like I'm the master of the kitchen and food is my faithful slave! This blog will capture all the yummy (and not so yummy) things that I attempt to make so wish me luck!


